By: CS2113-T16-4
- 1. Introduction
- 2. Quick Start
- 3. Fields
- 4. Features
- 4.1. Add employee’s data :
add - 4.2. Edit an existing employee’s data :
edit - 4.3. Locating persons by name or employee ID :
find - 4.4. Filter and list of specific employee’s data :
filter - 4.5. Delete an employee’s data :
delete - 4.6. Select an employee :
selectPerson - 4.7. Modify the Salary and/or Bonus of an employee :
modifyPay - 4.8. Modify the Salary and/or Bonus all listed employee(s) :
modifyAllPay - 4.9. Add expenses claims under a specific employee :
addExpenses - 4.10. Delete expenses claims of a specific employee :
deleteExpenses - 4.11. Select an expenses claim :
selectExpenses - 4.12. Clear expenses list :
clearExpenses - 4.13. Add a new schedule :
addSchedule - 4.14. Delete an existing schedule :
deleteSchedule - 4.15. Add multiple work schedules :
addWorks - 4.16. Delete multiple work schedules :
deleteWorks - 4.17. Add multiple leave schedules :
addLeaves - 4.18. Delete multiple leave schedules :
deleteLeaves - 4.19. Calculate total leaves in a year :
calculateLeaves - 4.20. Select schedule in the schedule list :
selectSchedule - 4.21. Clear the entire schedule list :
clearSchedules - 4.22. Add new recruitment post :
addRecruitmentPost - 4.23. Edit an existing recruitment post :
editRecruitmentPost - 4.24. Select an existing recruitment post :
selectRecruitmentPost - 4.25. Delete an existing recruitment post :
deleteRecruitmentPost - 4.26. Clear recruitment posts :
clearRecruitmentPost - 4.27. Listing all employees :
list - 4.28. View all available functions or commands :
help - 4.29. Listing entered commands :
history - 4.30. Undoing previous command :
undo - 4.31. Redoing the previously undone command :
redo - 4.32. Clearing all entries :
clear - 4.33. Exiting the program :
exit - 4.34. Saving the data
- 4.35. Keyword suggestion and auto complete feature [Upcoming in 2.0]
- 4.36. Employees' income report generation feature [Upcoming in 2.0]
- 4.37. Send Calendar:
sendCalendar[Upcoming in 2.0] - 4.38. Publish recruitment posts to job portal:
publishRecruitmentPost[Upcoming in 2.0] - 4.39. Expenses Report:
expensesReport[Upcoming in 2.0] - 4.40. Encrypting data files
[coming in v2.0]
- 4.1. Add employee’s data :
- 5. FAQ
- 6. Command Summary
1. Introduction
Centralised Human Resource System (CHRS) is for the human resource personnel who use a desktop to manage the employee’s information. More importantly, CHRS is optimized for personnel with the preference of working with a Command Line Interface while still having the benefits of a Graphical User Interface (GUI). After familiarizing with the CLI functions, CHRS can get your contact management tasks done faster than traditional GUI apps. Interested? Jump to the Section 2, “Quick Start” to get started. Enjoy!
2. Quick Start
-
Ensure you have Java version
9or newer installed in your Computer. -
Download the latest
CHRS.jarhere. -
Copy the file to the folder you want to use as the home folder for your Centralised Human Resource System.
-
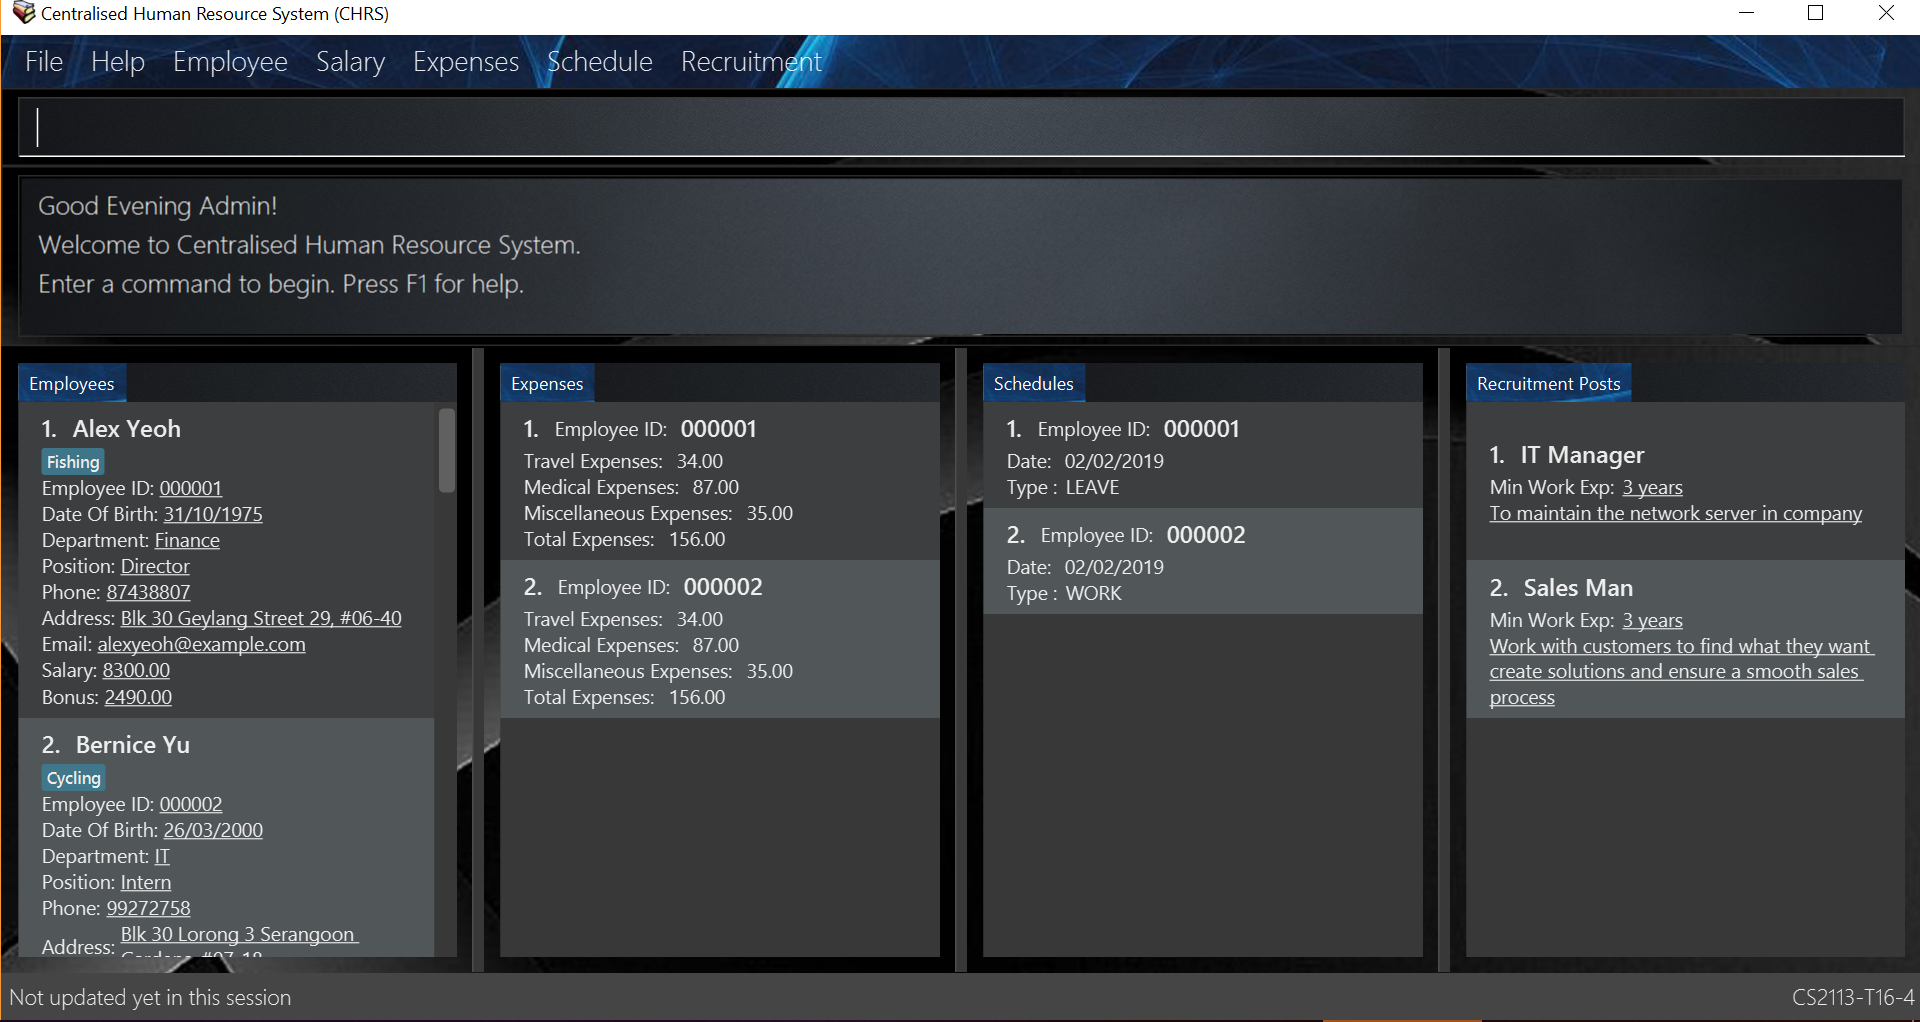
Double-click the file to start the app. The GUI should appear in a few seconds.
-
Type the command in the command box and press Enter to execute it.
e.g. typinghelpand pressing Enter will open the help window. -
Some example commands you can try:
-
list: lists all employee details -
addid/000001 n/John Doe dob/21-01-1993 p/98765432 e/johnd@example.com d/Finance r/Intern a/John street, block 123, #01-01 s/600: adds an employee namedJohn Doeto CHRS. -
delete3: deletes the employee with the index '3' in CHRS -
exit: exits the app
-
-
Refer to Section 4, “Features” for details of each command.
3. Fields
An employee can have the following fields associated:
| Field Name | Prefix | Limitations |
|---|---|---|
EMPLOYEEID |
id/ |
Employee Id should only contain exactly 6 numbers |
NAME |
n/ |
Name should only contain alphabets and spaces and it should be at least 3 characters long |
DATE_OF_BIRTH |
dob/ |
Date Of Birth should be in the format of DD/MM/YYYY and it only allows dates from 01/01/1900 to 31/12/2002 |
PHONE_NUMBER |
p/ |
Phone numbers should only contain numbers and it should be at least 3 digits long |
e/ |
Email should be in the format of local-part@domain. |
|
DEPARTMENT |
d/ |
Department should only contain alphabets and spaces and it should be within 2 to 30 characters long |
RANK_POSITION |
r/ |
Rank/Position should only contain alphabets and spaces and it should be within 2 to 30 characters long |
ADDRESS |
a/ |
Address can take in any values without limitations |
SALARY |
s/ |
Takes in a maximum of 6 whole numbers and 2 decimal place. (Max. value in total = 999999.99) |
BONUS |
b/ |
Only take in positive numbers with maximum of 2 decimal places from 0 to 24 |
A schedule post should include things below
| Field Name | Prefix | Limitations |
|---|---|---|
EMPLOYEEID |
id/ |
Employee Id should only contain exactly 6 numbers. |
DATE |
d/ |
Date must be a valid date in the calendar DD/MM/YYYY]. Year must also fall into the range of 2000-2099. Leading 0s can be omitted in day and month field. You are not allowed to schedule for dates that have past today’s date. |
TYPE |
t/ |
Type can be either WORK or LEAVE only, case not sensitive. |
An employee can incur the following expenses
| Field Name | Prefix | Limitations |
|---|---|---|
EMPLOYEEID |
id/ |
Employee Id should only contain exactly 6 numbers |
TRAVELEXPENSES |
tra/ |
Maximum of 6 whole numbers and 2 decimal points |
MEDICALEXPENSES |
med/ |
Maximum of 6 whole numbers and 2 decimal points |
MISCELLANEOUS |
misc/ |
Maximum of 6 whole numbers and 2 decimal points |
Total Expenses |
- |
Maximum of 7 whole numbers and 2 decimal points |
A recruitment post should include things below
| Field Name | Prefix | Limitations |
|---|---|---|
JOB_POSITION |
jp/ |
Job position accepts only characters. It must not be blank and should not include numbers and punctuation mark. And users are not allowed to exceed the character limit which is from 1 to 20 |
MINIMAL_YEARS_OF_WORKING_EXPERIENCE |
me/ |
Minimal years of working experience must be integers and should not be blank . And It is limited from 0 to 30 |
JOB_DESCRIPTION |
jd/ |
Job description accepts only characters and punctuation marks including only comma, full stop and single right quote. It must not be blank and should not include numbers. And users are not allowed to exceed the character limit which is from 1 to 200 |
4. Features
Command Format
-
Words in
UPPER_CASEare the parameters field Name to be supplied by the user e.g. inadd n/NAME,NAMEis a parameter which can be used asadd n/John Doe. Refer to Section 3, “Fields” for details of each field constraints. -
Items in square brackets are optional e.g
n/NAME [t/TAG]can be used asn/John Doe t/friendor asn/John Doe. -
Items with
… after them can be used multiple times including zero times e.g.[t/TAG]…can be used ast/friend,t/friend t/familyetc. -
Parameters can be in any order e.g. if the command specifies
n/NAME p/PHONE_NUMBER,p/PHONE_NUMBER n/NAMEis also acceptable. -
Commands which specified INDEX as part of the input requires a positive integer within the range of INT_MAX.
-
All prefixes to each field such as
d/,r/,n/, etc, are to be preceded with a space.
4.1. Add employee’s data : add
Adds employee’s data to the database
Format: add id/EMPLOYEEID n/NAME dob/DATE_OF_BIRTH p/PHONE_NUMBER e/EMAIL d/DEPARTMENT r/RANK_POSITION a/ADDRESS s/SALARY t/[TAGS]…
Examples:
-
add id/000001 n/John Doe dob/13/12/2000 p/98765432 e/johnd@example.com d/IT r/Assistant a/John street, block 123, #01-01 s/3000.00 t/FlyKite
Adds an employee with the fields listed above -
add id/888888 n/Betsy dob/23/05/1987 p/95544332 e/betsy@example.com d/Account r/Manager a/Betsy street, block 3, #11-01 s/5000.00
Adds an employee with the fields listed above
Any usage of add command that will result in duplicated employeeId or phone number or email will be rejected. Additionally, duplicated name alongside date of birth will also be rejected.
|
4.2. Edit an existing employee’s data : edit
Edit an existing employee’s data in CHRS.
Format: edit INDEX [n/NAME] [p/PHONE_NUMBER] [a/ADDRESS] [e/EMAIL] [d/DEPARTMENT] [r/RANK_POSITION]
| Include at least one field alongside the INDEX. The existing values of the employee will be updated to the input values. |
Examples:
-
edit 1 p/98765432 d/HR r/Manager
Edits employee at index 1 to have the new input of phone, department and rank/position
Any usage of edit command that will result in duplicated phone number or email will be rejected. Additionally, usage of this command to edit an employee’s name to be the same as another employee who has the same date of birth will be rejected.
|
4.3. Locating persons by name or employee ID : find
Find the employee’s name that contains the input or find the employee id that matches the input. The expenses and schedule list will also be updated accordingly to show only the matched employee(s)' expenses and schedule.
Format: find [NAME] [EMPLOYEEID]
|
Include only one of the fields, either Name or Employee Id. The NAME parameter is case-insensitive, i.e. The command find john will find the instances of JoHn, joHN, etc.
|
Examples:
-
find John
Find all instances of John, and his associated expenses and schedule -
find 000001
Find the employee with employee ID000001, and his/her associated expenses and schedule
Any usage of find command will be rejected if it contains special characters or alphanumeric input. It accepts only either alphabets or numbers in a single input, not both.
|
4.4. Filter and list of specific employee’s data : filter
Filters out the employees whose department and/or rank/position contains the keyword(s) input from the user and list them in ascending or descending name order. The expenses and schedule list will also be updated accordingly to show only the matched employees' expenses and schedule.
Format: filter SORT_ORDER [d/DEPARTMENT] [r/POSITION]
|
The SORT_ORDER parameter should either be asc for ascending or dsc for descending. The SORT_ORDER parameter is case-insensitive. Include either department or rank/position or both, at least one of the field must be included alongside the sort order. The keywords are delimited by a space, i.e filter asc d/human resource would mean the keywords are "human" and "resource". The keywords matching is case-insensitive. |
Examples:
-
filter asc d/Human Resource r/Manager
List all employees whose department contains the keyword of either human or resource and rank/position contains the keyword of manager in ascending name order. Expenses and schedule list will also be updated to show only matched employee(s)' expenses and schedule(s). -
filter dsc d/Finance
List all employees whose department contains the keyword of finance in descending name order. Expenses and schedule list will also be updated to show only matched employee(s)' expenses and schedule(s).
Any usage of filter command that results in the same prefix appearing more than once will be rejected. Example: filter asc d/Human d/Finance will be rejected.
|
4.5. Delete an employee’s data : delete
Deletes the specified employee from the CHRS. All existing schedules or expenses with the same employee id will be deleted as well.
Format: delete INDEX
Examples:
-
delete 4
Deletes the employee with the index of '4' in the list.
4.6. Select an employee : selectPerson
Select an employee based on employee list’s index ID.
Format: selectPerson INDEX or sp INDEX
Examples:
-
selectPerson 1
Select the employee with the index of '1' in the list.
4.7. Modify the Salary and/or Bonus of an employee : modifyPay
Modify the Salary and/or Bonus of the employee identified by the index.
Format: modifyPay INDEX [s/SALARY] [b/BONUS] or mp INDEX [s/SALARY] [b/BONUS]
|
At least one of either Salary or Bonus must be included Bonus will be replaced by new values with every modification |
Examples:
-
modifyPay 1 s/300
Modify the Salary of employee with index '1' with 300 increment -
modifyPay 2 b/2
Modify the Bonus of employee with index '2' to 2 months of the salary -
modifyPay 3 s/%5 b/1
Modify the Salary of employee with index '3' by 5% increment and Bonus to 1 month of salary
|
Modification to Salary and/or Bonus that causes negative values will be rejected Modification to Salary that goes higher than 999999.99 will be rejected since Salary can only hold a maximum of 6 whole numbers and 2 decimal places. |
4.8. Modify the Salary and/or Bonus all listed employee(s) : modifyAllPay
Modify the Salary and/or Bonus of all the employee(s) shown on the display list.
Format: modifyAllPay [s/SALARY] [b/BONUS] or map [s/SALARY] [b/BONUS]
|
At least one of either Salary or Bonus must be included Bonus will be replaced by new values with every modification |
Examples:
-
modifyAllPay s/300
Modify the Salary of all the listed employee(s) by increment of 300 -
modifyAllPay b/2
Modify the Bonus of all the listed employee(s) to 1 month of their salary -
modifyAllPay s/%5 b/1
Modify the Salary of all the listed employee(s) by 5% increment and Bonus to 1 month of salary
|
Modification to Salary and/or Bonus that causes negative values to any employee(s) on the list will be rejected Modification to Salary that goes higher than 999999.99 will be rejected since Salary can only hold a maximum of 6 whole numbers and 2 decimal places. |
4.9. Add expenses claims under a specific employee : addExpenses
Add new expenses for employee or modify expenses if there already exists an expenses
Format: addExpenses id/EMPLOYEEID [tra/TRAVELEXPENSES] [med/MEDICALEXPENSES] [misc/MISCELLANEOUS]
Or ae id/EMPLOYEEID [tra/TRAVELEXPENSES] [med/MEDICALEXPENSES] [misc/MISCELLANEOUS]
At least one of the fields, Travel Expenses, Medical Expenses, Miscellaneous Expenses must be included.
Examples:
-
ae id/000001 tra/111 med/222 misc/333
Creates a new expenses that contain 111.00, 222.00 and 333.00 for the above fields for employee with employee id '000001'.
Total Expenses will reflect 666.00. -
addExpenses id/000002 med/111 misc/222
Creates a new expenses that contain 111.00, 222.00 for the above fields for employee with employee id '000002'. Expenses will contain 0.00 for fields not included in command.
Total Expenses will reflect 333.00.addExpenses id/000002 tra/111 med/222 misc/-111
Add 111.00, 222.00 and minus 111.00 for the above fields for employee with employee id '000002'.
Total Expenses will reflect 555.00.
Any usage of addExpenses Command that will result in negative value for any fields will be rejected.
|
4.10. Delete expenses claims of a specific employee : deleteExpenses
Deletes expenses claim from an employee.
Format: deleteExpenses INDEX or de INDEX
Examples:
-
deleteExpenses 1
Deletes expenses claim from employee with Index '1' in the list.
4.11. Select an expenses claim : selectExpenses
Select an expenses based on expenses list index ID. User could use command_alias: 'se'.
Format: selectExpenses INDEX or se INDEX
Examples:
-
selectExpenses 1
Select the expenses with the index of '1' in the list
4.12. Clear expenses list : clearExpenses
Clear all expenses at one go. User could use command_alias: 'ce'.
Format: clearExpenses or ce
4.13. Add a new schedule : addSchedule
Add a new schedule for an employee.
Format: addSchedule id/EMPLOYEEID d/DATE t/TYPE or as id/EMPLOYEEID d/DATE t/TYPE
Examples:
-
addSchedule id/000001 d/02/02/2019 t/WORK
Adds a new schedule for employee id 000001, date 02/02/2019, to work on that day. -
as id/000001 d/03/03/2019 t/LEAVEAdds a new schedule for employee id 000001, date 03/03/2019, to be on leave for that day.
|
Scheduling with an employee id that doesn’t exist in the address book will be rejected. You are not allowed to schedule for dates that have past today’s date. Exact duplicate schedules will be rejected. |
4.14. Delete an existing schedule : deleteSchedule
Deletes the specified schedule from the schedule list panel.
Format: deleteSchedule INDEX or ds INDEX
Examples:
-
deleteSchedule 1
Deletes the schedule with the index of '1' in the list. -
ds 2
Deletes the schedule with the index of '2' in the list.
4.15. Add multiple work schedules : addWorks
Add work schedules for all the observable employees in the employees list pane.
Use find / filter / list to get the desired employees you wish to schedule.
All observable employees in the employees list pane will be scheduled work schedule
with the date specified by the user.
Format: addWorks d/DATE [d/DATE]… or aw d/DATE [d/DATE]…
Examples:
-
addWorks d/02/02/2019
Adds a new schedule for all observable employees in the employees list panel with date 02/02/2019, to work on that day. -
aw d/02/02/2019 d/03/03/2019
Adds new schedules for all observable employees in the employees list panel with date 02/02/2019 and 03/03/2019, to work on that day.
|
For those employees whom are not scheduled with the date, the command will
create a new schedule. When all employees are scheduled with the date, the command will tell the user that every observable employee in the list have been scheduled with the specified date. You are not allowed to schedule for dates that have past today’s date. |
4.16. Delete multiple work schedules : deleteWorks
Delete work schedules for all the observable employees in the employees list pane.
Use find / filter / list to get the desired employees you wish to schedule.
All observable employees in the employees list pane will be deleted work schedules
with date specified by the user.
Format: deleteWorks d/DATE [d/DATE]… or dw d/DATE [d/DATE]…
Examples:
-
deleteWorks d/02/02/2019
Deletes a schedule for all observable employees in the employees list panel with date 02/02/2019, with work on that day. -
dw d/02/02/2019 d/03/03/2019
Deletes schedules for all observable employees in the employees list panel with date 02/02/2019 and 03/03/2019, with work on that day.
|
For those employees whom are scheduled with the date, the command will
delete the work schedule. When all employees are deleted with the scheduled date, the command will tell the user every observable employees in the list does not have work schedule on the specified date. |
4.17. Add multiple leave schedules : addLeaves
Add leave schedules for all the observable employees in the employees list pane.
Use find / filter / list to get the desired employees you wish to schedule.
All observable employees in the employees list pane will be scheduled
with leave and date specified by the user.
Format: addLeaves d/DATE [d/DATE]… or al d/DATE [d/DATE]…
Examples:
-
addLeaves d/02/02/2019
Adds a new schedule for all observable employees in the employees list panel with date 02/02/2019, to be on leave on that day. -
al d/02/02/2019 d/03/03/2019
Adds new schedules for all observable employees in the employees list panel with date 02/02/2019 and 03/03/2019, to be on leave on that day.
|
For those employees whom are not scheduled with the date, the command will
create a new leave schedule. When all employees are scheduled with the date, the command will tell the user that every observable employees in the list have been scheduled with the specified date. You are not allowed to schedule for dates that have past today’s date. |
4.18. Delete multiple leave schedules : deleteLeaves
Delete leave schedules for all the observable employees in the employees list pane.
Use find / filter / list to get the desired employees you wish to schedule.
All observable employees in the employees list pane will be deleted leave schedules
with date specified by the user.
Format: deleteLeaves d/DATE [d/DATE]… or dl d/DATE [d/DATE]…
Examples:
-
deleteLeaves d/02/02/2019
Deletes a schedule for all observable employees in the employees list panel with. date 02/02/2019, with leave on that day. -
dl d/02/02/2019 d/03/03/2019
Deletes schedules for all observable employees in the employees list panel with. date 02/02/2019 and 03/03/2019, with leave on that day.
|
For those employees whom are scheduled with the date, the command will
delete the schedule. When all employees are deleted with the scheduled date, the command will tell the user every observable employee in the list does not have leave schedule on the specified date. |
4.19. Calculate total leaves in a year : calculateLeaves
Calculates total number of leaves scheduled for an employee for the entire specified year in the schedule list.
Format: calculateLeaves id/EMPLOYEEID y/YYYY or cl id/EMPLOYEEID y/YYYY
Examples:
-
calculateLeaves id/000001 date/2019
Calculates total number of leave scheduled for an employee id 000001 in whole of year 2019. -
cl id/000002 date/2020
Calculates total number of leave scheduled for an employee id 000002 in whole of year 2020.
4.20. Select schedule in the schedule list : selectSchedule
Select a schedule based on schedule index ID.
Format: selectSchedule INDEX or ss INDEX.
Examples:
-
selectSchedule 1
Select the schedule with the index of '1' -
ss 1
Select the schedule with the index of '1'
4.21. Clear the entire schedule list : clearSchedules
Clear the entire schedule list.
Format: clearSchedules. or cs.
Examples:
-
clearSchedules
Clear the entire Schedule List.
4.22. Add new recruitment post : addRecruitmentPost
Add a recruitment post based on job position, minimal years of working experience and job description.
Format: addRecruitmentPost jp/JOB_POSITION me/MINIMAL_YEARS_OF_WORKING_EXPERIENCE jd/JOB_DESCRIPTION or
arp jp/JOB_POSITION me/MINIMAL_YEARS_OF_WORKING EXPERIENCE jd/JOB_DESCRIPTION
Examples:
-
addRecruitmentPost jp/IT Manager me/3 jd/maintain the functionality of company server
Add an recruitment post with the available position called IT Manager, and the job requires minimal 3 years of working experience in similar field. The job position requires the candidates' ability to maintain the functionality of company server -
arp jp/IT Manager me/3 jd/maintain the functionality of company server
Add an recruitment post with the available position called IT Manager, and the job requires minimal 3 years of working experience in similar field. The job position requires the candidates' ability to maintain the functionality of company server
| Duplicate recruitment posts are not allowed. Minimal one field should be different. |
4.23. Edit an existing recruitment post : editRecruitmentPost
Edit a recruitment post based on its index no.
Format: editRecruitmentPost [Index] jp/JOB POSITION me/MINIMAL YEARS OF WORKING EXPERIENCE jd/JOB DESCRIPTION
or erp [Index] jp/JOB POSITION me/MINIMAL YEARS OF WORKING EXPERIENCE jd/JOB DESCRIPTION
Examples:
-
editRecruitmentPost 1 jp/IT Manager me/3 jd/To maintain the company server
Edit the recruitment post with index 1. And the post information from job position, minimal working experience to job description respectively changes to IT manager, minimal working experience of 3 years in relevant field and the job description is to maintain the company server. -
erp 1 jp/IT Manager me/3 jd/To maintain the company server
Edit the recruitment post with index 1. And the post information from job position, minimal working experience to job description respectively changes to IT manager, minimal working experience of 3 years in relevant field and the job description is to maintain the company server.
| Minimal one field should be changed in order to make the editing recruitment post function work. |
4.24. Select an existing recruitment post : selectRecruitmentPost
Select a recruitment post based on post index ID.
Format: selectRecruitmentPost INDEX or srp INDEX
Examples:
-
selectRecruitmentPost 1
Select the recruitment post with the index of '1'
| At least one recruitment post should be added in the recruitment post list panel before performing this function. |
4.25. Delete an existing recruitment post : deleteRecruitmentPost
Delete a recruitment post based on post index ID.
Format: deleteRecruitmentPost INDEX or drp INDEX
Examples:
-
deleteRecruitmentPost 1
Deletes the recruitment post with the index of '1'
| At least one recruitment post should be added in the recruitment post list panel before performing this function. |
4.26. Clear recruitment posts : clearRecruitmentPost
Clear all recruitment posts at one go.
Format: clearRecruitmentPost or crp
4.27. Listing all employees : list
Shows a list of all employees, schedules, recruitment posts and expenses claims in CHRS.
Format: list
4.28. View all available functions or commands : help
Views all the functions and commands that the CHRS have.
Format: 'help'
| A UserGuide popup window will appear for the user. |
4.29. Listing entered commands : history
Lists all the commands that you have entered in reverse chronological order.
Format: history
|
Pressing the ↑ and ↓ arrows will display the previous and next input respectively in the command box. |
4.30. Undoing previous command : undo
Restores CHRS to the state before the previous undoable command was executed. If a undoable command is executed after undo, then the command that was undone will not be undoable anymore as it is already undone.
Format: undo
Examples:
-
delete 1
list
undo(reverses thedelete 1command) -
selectEmployee 1
list
undo
Theundocommand fails as there are no undoable commands executed previously -
delete 1
clear
undo(reverses theclearcommand)
undo(reverses thedelete 1command) -
delete 1
undo(reverses thedelete 1command)
clear(delete 1commmand will no longer be undoable as it is already undone)
undo(reverses theclearcommand)
undo(no more commands to undo)
|
Undoable commands: those commands that modify CHRS content.
For commands similar functions to |
4.31. Redoing the previously undone command : redo
Reverses the most recent undo command.
Format: redo
Examples:
-
delete 1
undo(reverses thedelete 1command)
redo(reapplies thedelete 1command) -
delete 1
redo
Theredocommand fails as there are noundocommands executed previously -
delete 1
clear
undo(reverses theclearcommand)
undo(reverses thedelete 1command)
redo(reapplies thedelete 1command)
redo(reapplies theclearcommand)
|
Redoable commands: those commands that modify CHRS content.
For commands similar functions to |
4.34. Saving the data
Address book data are saved in the hard disk automatically after any command that changes the data.
There is no need to save manually.
4.35. Keyword suggestion and auto complete feature [Upcoming in 2.0]
This feature will suggest keywords when filtering or finding employee and the keyword will be auto-completed by pressing TAB key. [Upcoming in 2.0]
4.36. Employees' income report generation feature [Upcoming in 2.0]
This feature will generate an employee payout report to show the break down of the Salary and Bonus in term of Base Salary, Bonus, Overtime Pay and CPF Contribution. [Upcoming in 2.0]
4.37. Send Calendar: sendCalendar [Upcoming in 2.0]
Send calendar to the employee for employee to import schedule, sent using the Employee’s email address. [Upcoming in 2.0]
4.38. Publish recruitment posts to job portal: publishRecruitmentPost [Upcoming in 2.0]
publishRecruitmentPost command allows users to publish an existing recruitment post to job portal such as job street
website. [Upcoming in 2.0]
4.39. Expenses Report: expensesReport [Upcoming in 2.0]
Generates an expenses report with the total expenses amount claimed and have not been claimed for a year [Upcoming in 2.0]
4.40. Encrypting data files [coming in v2.0]
Upcoming in 2.0! Stay Tune!
5. FAQ
Q1: How do I transfer my data to another Computer?
A1: Install the app in the other computer and overwrite the empty data file it creates with the file that contains the data of your previous Address Book folder.
Q2: What is the purpose of this app?
A2: To provide a centralized and low-budget platform for personnel working in the Human Resource field to complete their work in a faster and more dynamic ways.
Q3: Can I run it with Java version 8 and below?
A3: It will be best to run it with Java version 9 and above. This is to prevent errors in running the application and ensure the functions are running as intended.
Q4: How do I know what functions are there in the application?
A4: The list of functions can be viewed by typing “help” in the command. This will direct the user to User Guide which have further elaborations and guide of how the functions are being used.
6. Command Summary
| Command Features | Command Word | Command Alias |
|---|---|---|
Add employee’s data |
add |
- |
Edit an existing employee’s data |
edit |
- |
Locating employee(s) by name or employee ID |
find |
- |
Filter and list of specific employee’s data |
filter |
- |
Delete an employee’s data |
delete |
- |
Select an employee |
selectPerson |
sp |
Modify the Salary and/or Bonus of an employee |
modifyPay |
mp |
Modify the Salary and/or Bonus all listed employee(s) |
modifyAllPay |
map |
Add expenses claims under a specific employee |
addExpenses |
ae |
Delete expenses claims of a specific employee |
deleteExpenses |
de |
Select an expenses claim |
selectExpenses |
se |
Clear expenses list |
clearExpenses |
ce |
Add a new schedule |
addSchedule |
as |
Delete an existing schedule |
deleteSchedule |
ds |
Add multiple work schedules |
addWorks |
aw |
Delete multiple work schedules |
deleteWorks |
dw |
Add multiple leave schedules |
addLeaves |
al |
Delete multiple leave schedules |
deleteLeaves |
dl |
Calculate total leaves in a year |
calculateLeaves |
cl |
Select schedule in the schedule list |
selectSchedule |
ss |
Clear the entire schedule list |
clearSchedules |
cs |
Add new recruitment post |
addRecruitmentPost |
arp |
Edit an existing recruitment post |
editRecruitmentPost |
erp |
Select recruitment post |
selectRecruitmentPost |
srp |
Delete recruitment post |
deleteRecruitmentPost |
drp |
Clear recruitment posts |
clearRecruitmentPost |
crp |
Listing all employees' |
list |
- |
View all available functions or commands |
help |
- |
Listing entered commands |
history |
- |
Undoing previous command |
undo |
- |
Redoing the previously undone command |
redo |
- |
Clearing all entries |
clear |
- |
Exiting the program |
exit |
- |